Permanent Differences - Tax Basis

Contents
In the Data Entry list, you can select the Perm Diffs - Tax Basis component to enter federal and jurisdiction data. In the Perm Diffs - Tax Basis page, you can refresh, export (informational purposes), print, add, edit, delete, import, export (template), show/hide columns, and filter your Provision, Interim Actual, Interim Forecast, and Estimated Payment data.
•There are two types of Permanent Differences: Equity Adjustments and P&L Adjustments. Select the appropriate type to achieve the desired provision effect.
•The list of Unit Codes, Jurisdictions, Classes, Subclasses and Tags are assigned to you by your administrator. For more information, review user permissions.
•To create adjustments using the same permanent difference code, you can make additional entries using different tag letters or class/subclass combinations.
•You can edit only the Attachment, Amount and Note data entry fields.
Import Template
To import information to the Permanent Differences- Tax Basis page, complete the appropriate fields for the #UPD# and #SPD# Unit Perm Diffs worksheets in the Import Numbers template.
See Data Entry Import for more information about the Permanent Differences - Tax Basis data import process.
Perm Diffs - Tax Basis
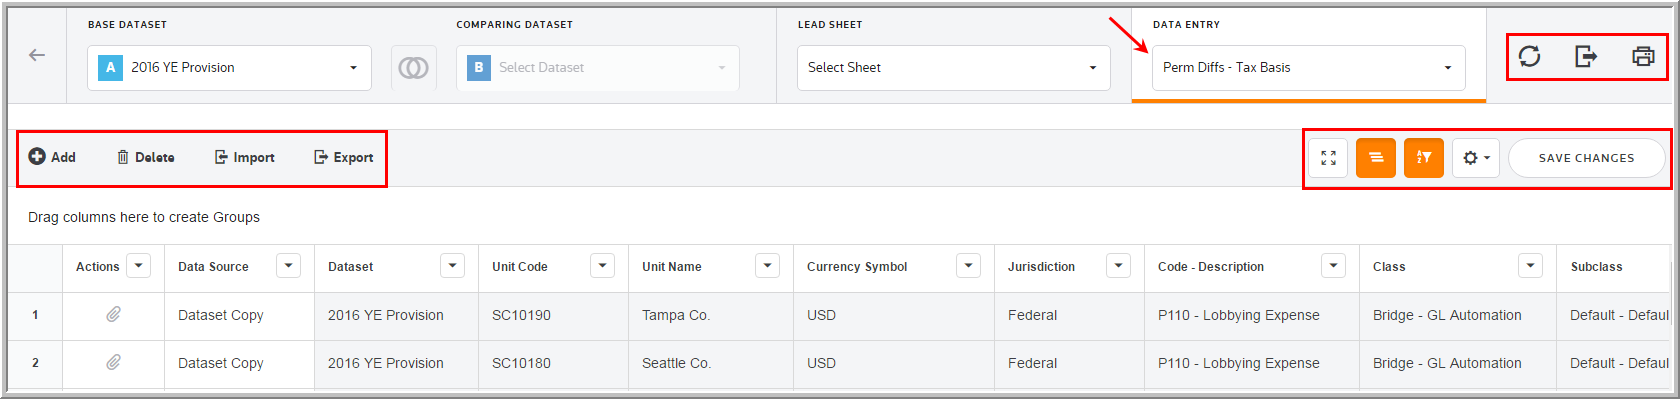
Data Entry Fields
The grid lets you enter amounts and select options from the drop-down lists. You can use the tab key to move between the fields much like an excel worksheet.
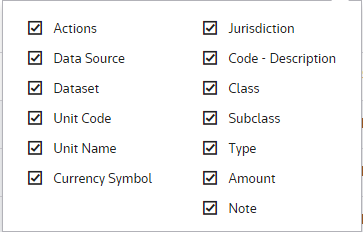
The Perm Diffs - Tax Basis component grid includes the following columns. See Data Table for more information about the grid options.
Adjustment Columns
•Columns are sorted by clicking on the column headers.
•You can drag and drop the columns to create a new view of the grid.
•"Drag a column header here to group by that column" lets you group data using the column headers. You drag each header(s) to that area and the data is sorted, accordingly.
•To "Hide" a column, click on a column header, right mouse click and select the header name. To restore the column header, right mouse click on the column header and select the column header. Select "Reset all saved settings" restores the column headers to the "Default" settings.
Actions
Actions allow you to supplement the adjustment with detail. Double click ![]() to add an attachment.
to add an attachment.
Data source
Data Source enables you to view the Data Source History.
Dataset
The Dataset selected in the Base Dataset drop-down list.
Unit Code
The Unit Code is established by an Administrator for the Perm Diffs - Tax Basis.
Unit Name
The Unit Name is established by an Administrator for the Perm Diffs - Tax Basis.
Currency Symbol
The Currency Symbol is established by an Administrator for the Perm Diffs - Tax Basis.
Jurisdiction
Jurisdiction lets you select the jurisdiction for the adjustment.
Code - Description
The code and description are established by an Administrator for the permanent difference.
Tag
The tag letter identifies each line entered in the originating source.
Class
The class identifies each line entered in the originating source.
Subclass
The subclass identifies each line description entered in the originating source. You can select Next Value as the subclass and the application generates the next "Code" number for the selected Code, Type and Class.
Type
•Type P (P&L Adjustment) results in a current tax provision expense offset in the payable account. The result does impact the overall effective tax rate.
•Type E (Equity Adjustment) results in a current tax provision expense offset in the payable account, as well as an equity contra expense that is offset in an equity account. This does not impact to the overall effective tax rate.
Amount
Positive amounts increase and negative amounts reduce the taxable income. Enter amounts in local currency. They are translated using the unit's weighted average FX rate to reporting currency.
Note
You can type notes to supplement the adjustment. You can access a history of the Notes within "Data Source History."
Delete Adjustments
To delete multiple adjustments:
•Hold down the Ctrl key and select the Delete key.
Note: To create adjustments using the same permanent difference code, you must make additional entries using different tag letters.