Unit Journal Entries

Contents
Journal Entry Details
In Manage Units, you can add Journal entries for Provision and Interim datasets.
See Journal Entry Profiles for more information about setting up your Journal Entries.
Note: When a unit is assigned to a Journal Entry Profile, the Journal Entry page no longer appears Manage Units. You will receive a message that there is already a Journal Entry Profile associated with this unit.
•The balances calculated on the journal entry page appear on the Journal Entry reports.
•Journal entries are created on a unit-by-unit basis.
•You can create Journal Entries in one unit and then copy them for other units using the import spreadsheet.
•Each unit can have either Unit Journal Entry configurations or Journal Entries profiles, not both.
•Unit journal entries configuration page is located in Manage Units > More drop-down list.
•To import journal entries, copy the data to the #JES# Journal Entries and #JETAX# JE Tax Calcs sheets for the "Import Numbers" template.
•Tax effected balances based on journal entry configurations appear in the Journal Entry reports.
To add Journal Entries in Manage Units:
1.Select the JE Type and then JE Code.
2.Select the JE Summary and type the Description.
Unit Journal Entries
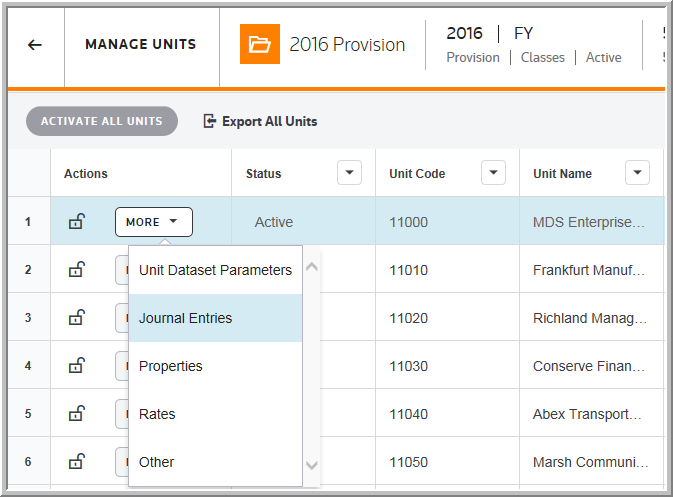
To create Journal Entries at the unit level:
1.Select My Datasets.
2.For a dataset, click the Units button and the Manage Units page opens.
3.In Manage Units, click the More button and a list of options for the unit administration appears.
4.Select Journal Entry Profiles.
5.Select Add.
6.Select the JE Type.
•This field is required.
•Define Jurisdiction (Federal, State, or both) type applicable to new Journal Entry.
7.Select the JE Code.
•Each journal entry line is required to have a unique JE Code.
8.Select the JE Summary.
•This field is optional.
•User defined value at Journal Entry Summary page from the System folder within Administration area.
•Based on the JE Summary value and groups multiple journal entries together for reports.
9.Type the Name.
10. Type the Description.
11. Select the Debit GL Account and then the Credit GL Account.
•The accounts will appear on the journal entry reports.
If the Debit GL Account and Credit GL Account are not listed then:
1.Select Administration > Manage Trial Balances > Trial Balances Sublines.
2.Select the account Code listed on the JE Post column.
3.Click Save.
12. Type Supplemental Information.
13. To rename the Flex Field Labels:
1.Select Administration > System > Manage Configurations > Advanced Functionality > Journal Entries.
2.Type the label name in the "Journal Entry Supplemental Field Name #1-9."
3.The entries are immediately saved.
Warning: Journal Entry configurations previously set up at the "unit level" within the Federal and State folders will be permanently removed.
Tax Calculations
To set up the Tax Calculations (These steps configure the Tax journal entries):
1.Click Add.
2.Click Tax Calc Filter to filter the list of tax calculations.
3.Click Tax Calculation to select the tax calculation.
4.Select Component to separately state a code with a tax calculation in the Difference column.
5.Type the Factor.
6.Click the plus sign to add the calculation.
To delete a Tax Calculation:
1.Select a Tax Calculation.
2.Click X.
GL Sources
To set up the General Ledger Sources (These steps configure the Book journal entries):
1.Click Add.
2.Select the JE Type Federal or State.
•The list is the same for both Debits and Credits.
3.Type the JE Code. The code entered is associated with the journal entry.
4.Select the JE Summary.
5.Type the Description.
6.Click the GL Sources tab.
7.Select the GL Account.
•The GL Account to select the General Ledger account.
8.Type the Factor.
•Enter a negative Factor to create a difference between the Book and Tax values (most common) in the Journal Entry report.
To delete the General Ledger Sources:
1.Select the GL Account.
2.Click X.
3.Click Delete All to delete all of the Tax Calculations from the list.
To delete Journal Entries:
1.Select the Journal Entry Code Name.
2.Click Delete.
To delete all of the Journal Entries, you must activate the Delete All option.
•Activate the Delete All option by selecting Administration > System > Manage Configurations > Advanced Functionality > Journal Entries.
1.For the parameter "Show Delete All Journal Entries Menu Option", click Yes.
2.For the parameter "Show Delete All button on Journal Entry Screen", click Yes.
3.Click Delete All to delete all journal entries.
Note: To complete the setup for the Journal Entry lines, select the Tax Calculation tab to configure Tax entries and the GL Sources tab to configure the Book entries.
Taxes Per Book
Taxes Per Book are entered on the Taxes Per book page. The balances entered are used for Journal entry reports and compare the balances entered to the provision calculations.
To enter in taxes per book for a Provision dataset:
1.Select My Datasets.
1.For a dataset, click the Units button and the Manage Units page opens.
2.In Manage Units, click the More button and then click Other.
2.Click the Taxes Per Book.
3.Type the balances.
To import taxes per book complete the appropriate fields on the #U# Unit sheet in the Import numbers template.